
Cleat position road bike: how to set up your cleats
Cleat position: Step-by-step guide to dial in your cleat position, for road bike, MTB and SPD or Look pedals.

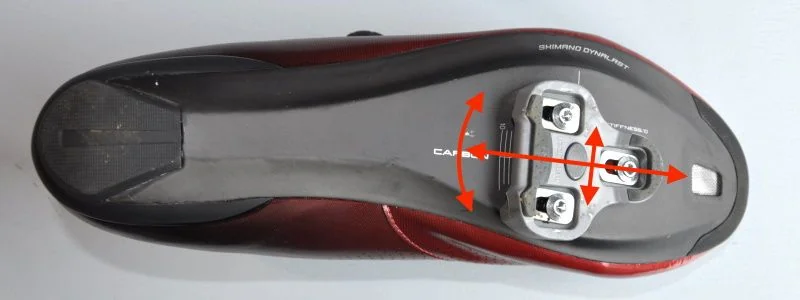
This guide on cleat position explains everything you need to know. The position of the cleats can be adjusted longitudinally, transversely, and in rotation. Incorrectly adjusted cleats might cause serious pains to, for example, the knees. In addition, your power transmission to the bike takes place between your feet and the pedals. Your cycling performance may be hampered by incorrect positioning of your feet on the pedals.
The adjustment of the cleats is only a small part of your cycling position. You can also do a full online bike fit with us so that you can cycle more comfortably, longer and faster.
Longitudinal cleat positioning
In the optimal position of the cleats, the ball of your foot is centred above the pedal axle. As you can see in the picture, the pedal axle should be placed between the joints of the biggest and the smallest toe. To do this, put on your shoes and mark the ball (most protruding point) of the foot under your biggest and smallest toe. For example with tape or a marker.
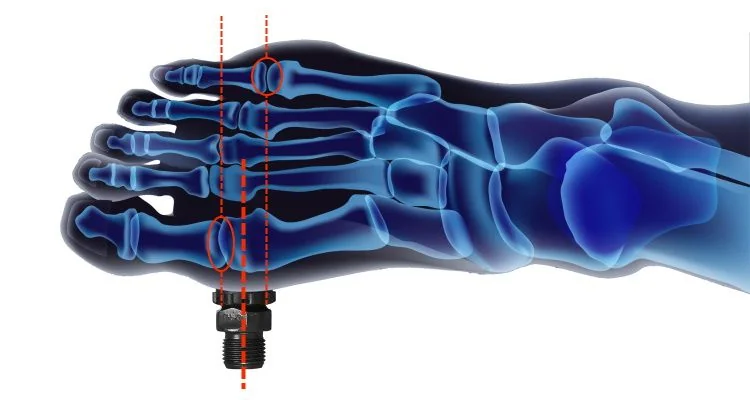
Most cleats have a mark that indicates the centre of the pedal axle (on SPD mtb pedals, this is the centre of the screws). Now attach the cleats in such a way that this marking on the cleats is exactly between the two markings on the shoe. Leave the markings on the shoe to check the position when you are actually on the bike.
Properly adjusting the cleat rotation
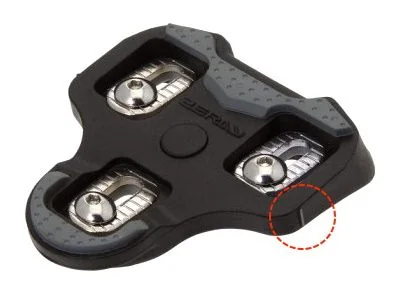
For the rotation, the rule applies that your feet should be in a position that is natural to you. Stand relaxed, with your feet shoulder-width apart. Jump up three times without thinking about it. Watch your feet position (heels in, out, or neutral), and adjust your cleats so that your feet are on the pedals in a similar position.
Adjust the rotation a bit if it does not feel natural while cycling.
Transverse cleat positioning
The transverse adjustment options are often minimal. A good starting point is to fix the cleats exactly in the middle. Do you have the feeling while cycling that your knee is not directly above your foot? Then you can adjust the position of the cleats to see if this improves things.
Cleat position by pedal system: road bike, MTB, SPD & Look
The three principles above (length, rotation, width) apply to every pedal system. Still, there are a few practical differences per pedal system and bike type that are useful to know when you set up your cleats.
Road bike cleat position (Look-style 3-bolt systems)
Road bikes typically use Look-style 3-bolt systems (Shimano SPD-SL, Look Keo, Time, Wahoo Speedplay). These cleats are large, fixed with 3 bolts, and protrude from the sole. The advantage: a larger contact surface and a stiff connection for maximum power transfer. The downside: walking on these cleats is awkward and slippery.
On Look-style cleats (and SPD-SL) you set the length using the marking that indicates the centre of the pedal axle. Align this marking exactly between the two markings on your shoe, as described above. Adjust the rotation in small steps when tightening. Even a small change has an immediate effect on the road, so go gentle.
MTB cleat position (SPD 2-bolt systems)
Mountain bikes almost always use SPD 2-bolt systems (Shimano SPD, Crankbrothers, Time ATAC). The cleats are small and recessed into the sole, which makes walking easy. On SPD cleats the centre of the pedal axle sits midway between the two mounting screws. Use that point to set the longitudinal position.
Some MTB shoes also offer more room to push the cleat further back than road shoes do. That can help on long rides or when you have calf or forefoot complaints. SPD systems also tend to have more rotational play (‘float’) than Look, slightly more forgiving if your rotation isn't perfectly dialled in.
Other cleat systems
Whether you ride SPD-SL, Speedplay, Look Keo or any other system: the principles above stay the same. Always check the manual of your specific pedal and cleat system for the correct bolt torque and recommended maintenance intervals.
Pains related to incorrect cleat position
As indicated earlier, incorrectly placed cleats may cause pains and injuries. The most common mistakes are cleats too far forward, too far back, or wrong rotation.
Cleats too far forward: sore feet, calf muscles or Achilles tendon
If your cleats are too far forward, this can lead to numb or burning feet and overload of the calf muscles or Achilles tendon. Move the cleats back a few millimetres and test the new position on a shorter ride.
Cleats too far back: loss of power transfer
If your cleats sit too far back, the pedal axle is behind the ball of your foot. This relieves the calves, but can reduce your power transfer and feels unnatural at higher cadences. Slide the cleats forward again until the pedal axle sits between the two toe joints.
Wrong rotation: pains on the inside or outside of the knees
If your heels are too far in, you can get pains on the inside of your knees. If your heels are too far out, this can lead to pains on the outside of your knees. Always adjust the rotation in small steps.
Help with other bike adjustments
We would like to also help you with the optimization of other elements of your bike setup. The most complex is finding your optimal riding position. This is complex because there is not one standard optimal position. Aerodynamics, maximum power, comfort and bike control all have different requirements for your riding position. Your personal cycling goals and priorities therefore play an important role in determining your optimal riding position.
For more explanation, please read our article What is your ideal riding position on the bike.
When determining the riding position, the positions of all your contact points (pedals, saddle, handlebars) with the bicycle are determined. In addition to the correct position, it is also important to optimise the contact points themselves. The articles behind the links below provide important tips and advice on how to do this. How do you determine your optimal:
Want to know exactly which measurements suit your body? Take our online bike fit and get your personal report right away.
Related articles
Knee pain cycling: how to fix knee pain from cycling
My knees hurt when cycling, why? Learn the causes per type of Knee pain cycling (kneecap, outside, inside, back) and how bike setup fixes it.
Road bike saddle setup: saddle height and setback guide
Road bike saddle setup, step by step: correct saddle height, saddle tilt and setback for your body. Prevent pains and ride faster with the right setup.
Ready to optimise your bike fit?
Get a personalised bike fitting report in just 15 minutes.
Start your bike fit